Enter a name of a new Form to be built with SMARTFORMS and press the Create command button.

The Form Builder appears on the screen.
Any node can be selected or expanded from the left hand side tree menu.

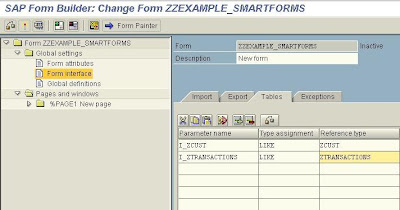
Select the Form Interface node and provide the names of the internal tables containing the data. (In this example we have a Customer table and a Customer's Transaction Table connected with an one to many relationship).

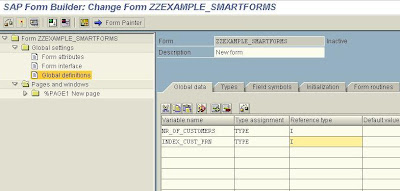
Select the Global Definitions and provide the names of two variables for controlling the page break after finishing a section of a Customer.

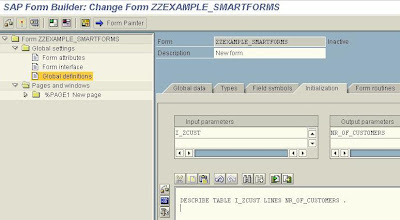
In the initialization tab of the Global Definitions node, give the code calculating the number of Customers. Input and output parameters should be provided so that the code works correctly.

After expanding the %PAGE1 node, we can notice that a Main Window exists. From the context menu (appearing by clicking the right mouse button) of the Main window select Create -> Complex Section.

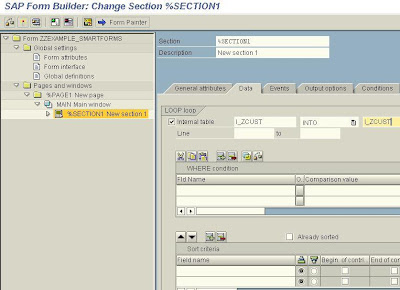
This Section has data which are processed repeatedly and the Output Type (the format) is Unstructured.

This Section has data which are processed repeatedly and the Output Type (the format) is Unstructured.

The data of this Section are retrieved from the internal table I_ZCUST and are stored in the data structure I_ZCUST in each iteration

At this point select the context menu of the Section and create a Text Element.

Type the names of the fields of the internal table in the General Attributes tab. The field names are enclosed in ampersands.

Type the names of the fields of the internal table in the General Attributes tab. The field names are enclosed in ampersands.

From the context menu of the Text Element create a series of Program lines.

This series of Program lines, (actually a single Program line), increases the index of Customers printed by one (Variable INDEX_CUST_PRN). Input and Output parameters should be declared on the appropriate fields of the tab (In this case the Input and the Output parameter is the variable INDEX_CUST_PRN).

From the context menu of the Program Lines create a second Complex Section

This Section has data which are processed repeatedly.
The Output Type (format) is a table.

Specify a Table Width and a Line Type.

Select the Data tab and specify the Loop in the I_ZTRANSACTIONS table and the Where condition.

On the Events tab select the Header and Footer events and specify a Height of the Footer.


Select the Header node and check the New Line checkbox


At this point from the %Section2 context menu select Create -> Text

On the Global Attributes tab of the Text Element type the fields of the internal table we wish to show on the form enclosed in ampersands. The Text node is Appended directly (check the relevant radio button).

From the context menu of the Footer Event select Create -> Command .


Drag the %Command1 created and drop it on the %Section2 node.
A popup window appears and select After the node %Section2.


So the %Command1 is aligned to the Footer of %Section2.
Check the Go to New Page checkbox

Check the Go to New Page checkbox

Select the Conditions tab of the Command element an set the condition that a new page is created if the last customer is not reached by the printing process (I e the Index of the Customers printed is less than the Number of Customers).

Start another session and call the transaction SE78

Expand the Graphics node on the left hand side tree menu, select BMAP Grid screens node and double click on it. On the right hand side provide the SAP name of a new graphic and check the Color radio button. Press the Import command button


On the appearing popup window provide the path where the bitmap image is stored and check the checkbox stating that Resides in the Printer Memory.
Press the Continue command button 


The appearing screen shows that the graphic has been successfully imported into the SAP graphics management.
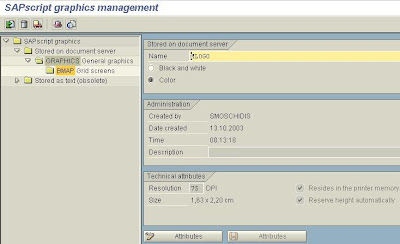

The appearing screen shows that the graphic has been successfully imported into the SAP graphics management.


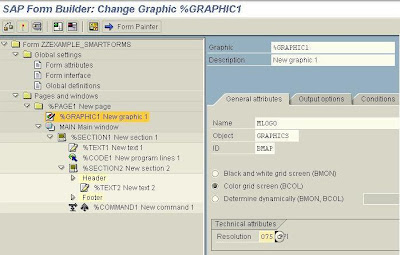
On the General Attributes tab of the %Graphic1 created type the SAP Name of the graphic and provide the Object, ID, Color attribute and Resolution.

Activate the Form from the menu path Form -> Activate


The function module SSF_FUNCTION_MODULE_NAME has as its import parameter a name of a Form created with SMARTFORMS and gives as output a function module name. The latter when executed with table parameters the internal tables of the SMARTFORMS Form, gives the final printout
Further reading in the SAP Library on link http://help.sap.com/saphelp_46c/helpdata/en/a9/de6838abce021ae10000009b38f842/frameset.htm. Or through the path Basis Components -> Basis Services / Communication Interfaces (BC-SRV) -> SAP Smart Forms (BC-SRV-SCR) .
Thanks for sharing very helpful information. I found another SAP BUILD Online Training India, site , they provide very helpful services.
ReplyDelete